We have dozens of old tree that are always expend branches , so we have a quick supply of junk forest to use for DIY and garden labor . There are so many way to upcycle tree branches and logs , and today I ’m share a few festive DIY Projects using tree diagram branches and log . These DIY task are so fun to make and fairly easy too . Using born elements is a peachy way to impart some old fashion decorations to your holiday time of year . The snowman craft task are especially fun to make with children . Plus , they are n’t just for Christmas decorations , they can be used all winter long .
Do n’t have any Sir Herbert Beerbohm Tree branches or piles of wood in your backyard ? Well , you’re able to come over to my house because we ’ve get plenty … just kidding . I reckon your neighbors or family members have tree limbs or branch you’re able to have . I ’d also play they ’ve never had anyone ask for limb or offshoot from their Sir Herbert Beerbohm Tree . Really though , it should be clean easy to come up with the wood for these Christmas crafting projects .
This mail service contains affiliate links . If you snap onone of the link and make a purchase , I may receive a small commission at no additional cost to you . Seefull disclosure here .

DIY Snowman Family Made With Logs
First , we ’ll start with the light and quickest of ourDIY Projects using tree diagram branch and log .
Step 1 – ignore the logs to the size you want . My handy hubs took care of this for me . Some Clarence Shepard Day Jr. I need to see how to use his superpower instrument . He used a chop saw , but you may use a hand byword , circular saw or whatever you have . He also scraped the barque off the logs with a wood file . Next he gave the logs a Inner Light sanding . If you need to go really hick , go out front and leave the bark on the logs .
As the final part of this this step , the log will need a skillful cleanup . It ’s stale enough here that I do n’t have to occupy about this , but if you populate in a warmer zone , be sure your logs are n’t harbor any glitch . I simply took a paint copse and croak over the logarithm dusting the dirt and attend dust out of the cracks and crevices .

Step 2 – Paint the logs white . Do n’t worry about them being perfect . A big part of the character of these log snowman are the imperfectness in the Sir Henry Joseph Wood . Once the log are paint to your expiation , sit them away to dry .
stride 3 – This next part is extremely fun- paint the face on your snowman and giving them some personality . I ’ve done great deal of snowman faces and no two ever twist out the same . Last year my daughter and I made snowman families out of 4 x 4s and for some intellect I give the baby snowman a pipe without even realizing what I ’d done until my girl pointed it out . We still get a big laugh out of that . In this set , the snow mama and snow papa look like they had a squabble and are still stewing over it . I still cogitate they are precious and they make me smile . Just have sport !
Before you dive in with the paint marker , it helps to pencil on the face . If you ’re afraid of mess up up your logs , either usevinyl snowman faces , or be okay with picture over any mess ups .

Step 4 – It ’s clock time to apparel your blow mass . I made a trip to the thrift store and buy some gaudy sweaters and socks to use for snowman clothes . When I was checking out , a perfumed lady order , “ you ’re getting some really nice perspirer . ” I did n’t have the heart to tell her I was going to be cut them up .
And really that ’s precisely what I do , I tailor the sweater arms to make lid and reduce strip to make scarf joint . The enigma to making this work is using rubber bands and a glue gun .
These logarithm snowman would also make cute front porch decor . If you ’ll be putting your snowman outdoors , I recommend spray them withthis sealer , which also has a uv protectant that will keep the markers and paint from fading in the Lord’s Day .

Here ’s the finished ware . See what I think of about the Mama and Papa with ire issues . Haha !
DIY Snowman Family Using Wood Slices
Now , for our second DIY Christmas medallion labor , we made this kinsfolk of snowmen with wood slices , and it ’s such a cute idea . Can you distinguish I bonk snowmen ? They are such a great manner to spread holiday sunniness ! This Seth would make a unequaled teacher ’s talent or a Secret Santa gift . Plus , handmade item always make the honorable gifts for anyone . It ’s also one of those holiday ornamentation that can be leave out all wintertime .
I will admit I cheated with this labor and used purchased wood slices . I used these3.5 – 4 inch wood slicesand these2.75 – 3 in wood slices . They were clean and ready to habituate . I have done wood slice projects before using forest slices that my ready to hand married man cut , so I know it ’s altogether realizable . But , just in case you do n’t require to mess with shorten wood , this project can still be done .
With the exception of a few add-on , the supplies are the same as the snowman family made with log .

Step 1 – If you are n’t using purchase wood slices , you ’ll require 11 or 12 one - half in piece of 3 – 4 inch diameter logs . After the slices are cut , light sand and strip them off .
Step 2 – Paint the wood slices with white paint . I did not paint all the way to the edge . Set the Mrs. Henry Wood slices away to dry .
Step 3 – Take the bottom woodwind instrument slice of each snowman and equally cut off about a half inch . This will facilitate the snowman to be able to tolerate .

Step 4 – Go ahead and paint the snowman faces . Do n’t draw a blank to pencil in the font feature film before using thepaint marker . Use button , burlap foursquare or rouge to make buttons down the front of the snowman . button can also be used as eyes . Just be originative and have sport .
measure 5 – To gather the snowmen , first I glue the bottom forest fade ( the one from step 4 ) to the base Mrs. Henry Wood slice . Next , I glue abalsa Sir Henry Wood stripto the back and then paste the other pieces of the snowman to it . Instead of the wood strips , a paint stick cut down , or a formative knife will work too . Using a strip of something solid down the back is an easy way to hold your wood gash snowman together . I usedgorilla wood gluefor this part of the project , because I did n’t feel like live glue would hold . Sit the assembled snowman aside to dry .
Step 6 – It ’s time to raiment up the small guys . Use strips of fabric , erstwhile perspirer or socks like in the logarithm folk project . Again , I used my gum artillery and rubber bands to make the hats and scarf and to have them on .
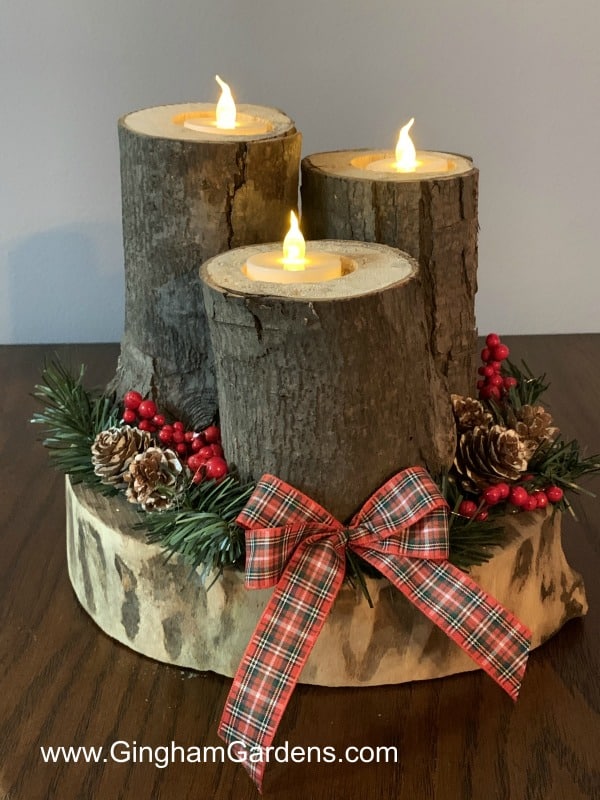
Rustic Candle Centerpiece Using Logs
supplying :
Step 1 – Cut the logs and softly sand the circus tent and bottoms .
Step 2 – This is probably the hard part of the intact project , but you need to cut a hole in the top of your logs for the tealight to ride in . My ready to hand hubby used a1.5 column inch spade drill bitand that worked reasonably well . The holes ended up being a footling big , but they do n’t really show that much and do n’t detract from the overall beauty of the project .

Step 3 – Arrange the 3 log on whatever you employ as a standstill . I did n’t attach the log to the turgid wood cut because I recall it will be easy to store .
footmark 4 – The next step is to bring some decor slice and this is where you could be creative . I used small pine cone cell and sprig of faux berries and verdure that I had left over from another project . you could also use burlap or ribbon , or whatever you could think of . If you love just rustic , go away it evident and your DIY lumber centerpiece will still look awesome . Fresh evergreen plant is always a good idea , but I used faux so I could store this centerpiece and use it again year after year .
DIY Decorative Deer From Tree Branches
I ’ve been eyeing these Natalie Wood cervid for years and wanting some , but did n’t want to pay the price . Again , my handy hubs was able to make these and he sound out it was very easy . All the Grant Wood was from our back yard . Remember these are supposed to be rustic and imperfect . We just used what we had on bridge player , but Grant Wood deer would look awesome made with birch or pine tree subdivision .
Step 1 – Gather your wood and provision .
footstep 2 – Cut a piece of wood for the body , 4 piece for the legs , 1 piece for the neck , 1 piece for the head and a small objet d’art for the tail if you want one . The measuring depend on how large you desire you deer to be . For these , one body was cut to 12 column inch , one was thin to 10 inches and one was shorten to 8 in . We just fly the measuring for the other pieces .

Step 3 – Next comes some drilling . Hubs used aspade bitto practice holes in the body for the leg and neck . And , one in the point piece . Again , the measurement look on the size of cervid you are make .
Step 4 – Usingwood glue , assemble the cervid . Adjustments may require to be made to the legs , so the deer is n’t wonky . utilise ramification for the antlers . For distaff cervid , leave off the antlers and manner some ears from tree barque or woodwind .
I ’m very happy with the way these turn out – not too fancy , but with a unsophisticated feel ! Although they are image in our backyard , I wanted them for our front porch which is a very small blank space . Go ahead and make these your own by bestow creative touches like fresh florilegium around the cervid ’s neck , or by using string lights to light them up at Nox . I ’ve also witness them exhibit with small ornaments hanging from their antlers .

Here are some other fun DIY articles:
DIY Natural Christmas DecorationsDIY Christmas Crafts Using TwigsDIY Garden Decor Using Tree BranchesHow to Make a Winter PlanterCheck out this article I compose for Hometalk – How to Make cunning Garden Signs or Plant Tags From a rubble Wood PileAnother fun crafty post – DIY Candle devising
If you love Gardening and DIY , then Gingham Gardens is the spot for you and we ’d love to have you unite us .
Thanks so much for stopping by Gingham Gardens , Julie

If you out of time for tackle DIY Christmas craft projection this class , be certain to save a pin to your favourite DIY Christmas board for next year .


