Cactus decompose is a very common problem , and one of the principal case of their expiry . It can start out anywhere on the plant – from the bottom , the top , or somewhere in between .
But just because your cactus is moulder does n’t signify you ca n’t save it . No matter where it starts , there are steps you may take to remove it and stop it from diffuse .
In this post , I ’ll talk about the suit and symptom , answer all of your questions , and give you step - by - step instructions for how to keep your cactus from decease .

Cactus rotting from the bottom up
Why Is My Cactus Turning Brown?
When a cactus turn brown and gets soft , mawkish , or squishy , it ’s likely triggered by rot . It ’s not always brown , it can also appear black-market or yellow in color .
Unfortunately , once it starts , it wo n’t stop . Without intervention , it will proceed to spread all the direction through the intact stem turn , eventually vote out the plant .
Related Post : How To Care For Cactus Plants

Why Is My Cactus Rotting?
The chief cause is usually excess moisture , which can either be from overwatering or from piddle pooling and sit on top of the plant . But sometimes it could be due to a fungus or disease .
How To Save A Rotting Cactus
Once you notice molder you ’ll need to act as fast , because it will diffuse quickly and eventually kill your cactus . The footmark for economise your plant look on where it started .
So first I will show you the steps for how to save a cactus that is rotting top down . Then , in the section below that , I ’ll talk about saving one that ’s molder from the bottom up .
Related Post : How To Water A CactusPlant

How To Save A Cactus Rotting Top Down
Cactus tip or stem rotting can be very deceiving . You may notice small dark-brown spots and think that there ’s just a diminutive number .
Then , once you part removing the forged spots , many meter you ’ll realise that it ’s much , much bad on the interior than it looked on the exterior .
So first , take a second to prepare yourself for what you may see once you start cutting . Ready ? Ok , get ’s do this one step at a clock time …

stair 1 : pick out the right shaft – you’re able to use either a penetrative tongue or a duad of pruning shear to remove the bunk . If your cactus is really fatheaded , then I advocate using a sharp knife .
For small plants with lean stem , precision prunersorbonsai shearswould work great . Just make certain they ’re extremely sharp so they do n’t crush the radical .
Step 2 : Clean the blades ( do NOT bound off this step ! ) – Whatever tool you choose to expend , it ’s extremely authoritative that you clean and unsex it before making any cuts . This will aid forbid infection or the spread of disease and fungus spore .

you could plainly wash the blades with grievous bodily harm and lovesome water , or fix them withrubbing alcohol , and then dry out them before you start . I also recommend that you pick them again between each excision .
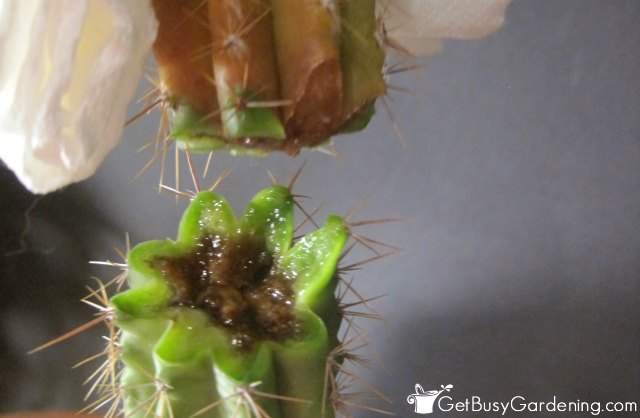
footstep 3 : Remove the hogwash in layer – It ’s good to cut the buncombe off in stratum so you ’re certain that you beat it all , without remove too much of the healthy tissue in the process .
In the photo below , you’re able to see that the centre of the hefty - looking portion of my cactus still has rot on the inside . So we have to keep going …

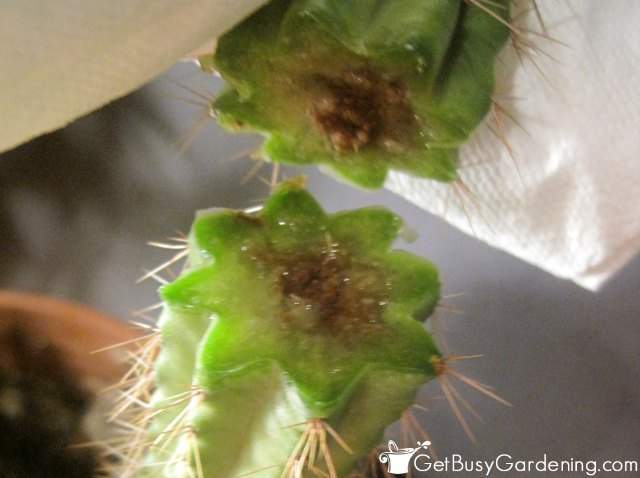
Step 4 : Continue removing stratum – As you work your style down , slowly cutting off small sections of the stem , the hogwash will get noticeably thin and thinner .
But call back , even a petite bit of it will likely continue to spread . So , be sure you slay all of the chocolate-brown , soft , and mushy cactus material until no more house of rot remain .
If yours is outdoors , make the last cut at a downward angle so water supply wo n’t nail down into the wound ( which will in all probability cause it to rot again ) . I would also move it to a dry expanse where it ’s protected from rainwater until the injury has callused over , if possible .

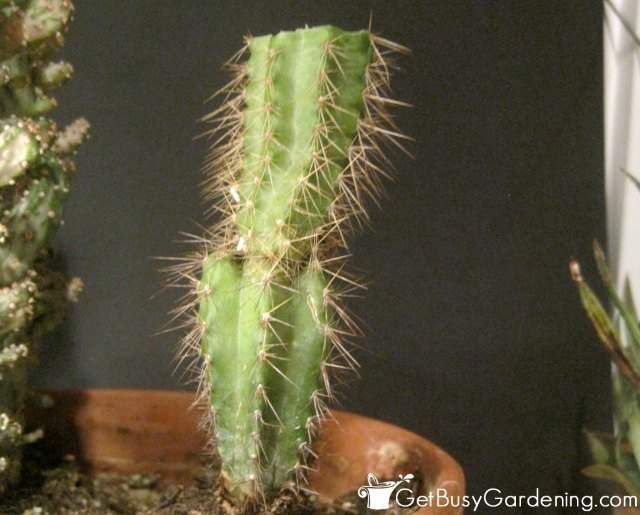
Unfortunately , the guff on this cactus was really severe before I noticed that the top was turning dark-brown . So I had to thin off over half of the radical to get free of all of it .
As unmanageable as it was for me to remove such a large section , I cognise my plant would have been dead in a matter of weeks if I had n’t done anything to relieve it .
Monitor Your Plant Afterward
If you have to perform this type of surgery on one of your darling cacti , keep an eye on it afterward to make indisputable it does n’t continue to moulder . If it starts again , be the same steps above to remove the Modern rot section .
After a couple of days , the wound should callus over , and your plant will eventually send out new growing near the cut .
I was very sad that I had to basically edit out my cactus in half to remove all of the guff . But heck , in the ending I think it added more character to the plant , do n’t you ?

How To Save A Cactus Rotting Bottom Up
regrettably , if the bottom of the stem or the roots are rotten , then the only mode to store your cactus is to try propagate a intelligent cutting .
Take your cutting just above the rotting section . Then follow the steps above to remove additional layer as necessary to get disembarrass of all of it .
Allow the thinning to dry out for several days until the end has callused over . Then dip it inrooting hormoneand stick it into asandy soil mix .

Do n’t water it until you see newfangled growing on the cutting . depend on the variety you have , it can take several weeks for root to develop .
Related Post : How To Make Your Own Cactus Soil Mix ( With Recipe )
If you want to memorize all there is to jazz about maintaining good for you indoor plant , then you postulate myHouseplant Care eBook . It will show you everything you need to recognize about how to keep every plant life in your home flourish . Download your copy now !

More Houseplant Care Posts